


Prisoner of the mind Cole Maquette control drawings.
I decided long ago that when I release Prisoner of the Mind the graphic novel in print 2013, I would hold a contest to give away special leather bound signed edition of the book, t-shirts, stickers and a lot of other cool stuff. But, the crown jewel would be a limited edition hand sculpted Maquette of one of my characters from the book.


This weekend I started the Maquette project to get the ball rolling. This sculpture is a work in progress. What you see here is two days of work, which equals about 10 hours total. The sculpture is still very rough, I would say about 60 to 70 percent finished.


In the past, I sculpted a lot, just about as much as drawing. At one point in my art career, I wasn’t sure which direction I wanted to point my attention more to, Drawing or Sculpture, but as I get older I realized that I don’t have to make a choice. Lately, I’ve been sculpting a lot less, actually not that much at all so I will be the first to tell you that what you see here needs a lot more work.


The model sheet, (control drawing above) pose I was going for is right out of the book. As you can see, it is a distressed I am going to die/kill look. It reminds me of the famous Incredible Hulk pose, or the “Most Muscular” pose that body builders do, which I’m not really trying to copy. Any kind of pose that you create today, chances are, have been done somewhere in the comic book world. There is always a hero pose or a victory pose in comics, you know what I’m talking about, anyway finding the right one is sometimes difficult, but fortunately, there is always time to change it.


The next step is for me to decide what size of a sculpture that I want to do. My original intention was 8 to 10 inches. It doesn’t really sound that big until you start putting clay to wire then it seem huge. I start with a very basic wire armature, and aluminum foil. I use aluminum foil to pad the wire frame to make the clay thinner. When I finally bake the sculpture, it cannot be thicker than about ½ inch or it will crack. The sculpture substrate I am working with is Super Sculpey Firm. It is a good strong clay, but I didn’t realize that I was going to use an entire pound of it on this skinny wire frame.

So, my first mistake was that I should have used a much more robust armature for the legs and torso area.


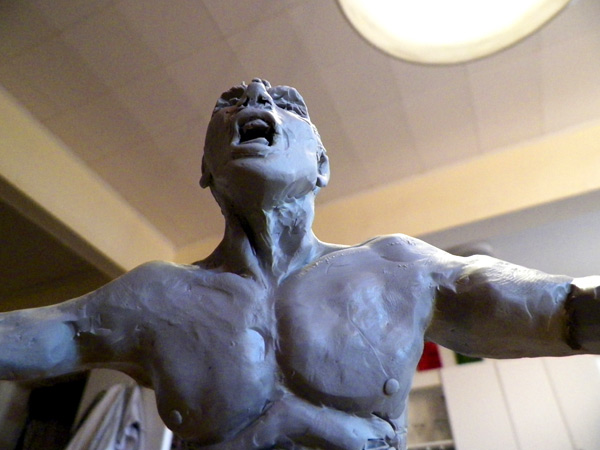
Not doing this created a weight problem later. Now, I have to put a pencil up his ass to give him temporary support. I also need to make some body adjustments to get the proportions right. His waist, torso area is too long, and his hips are too small.


I'm working out the musculature of his body to be more anatomically correct. I may end up chopping his arms off at the elbow, and re-sculpting them in a hard wax to get greater detail and strength. I will most likely rejoin them after I bake the sculpture so it’s more rigid. You can see the left arm above with some armature wire, and foil sticking through the clay skin.


The hands and fingers are too mushy, thighs need work, this is where a sculpture caliper comes into play to make sure that the feet, legs and arms are all the same thickness. I’ve reached a point where I was just about ready to ball the whole thing up and start over, but I figured I might as well take it all the way out and see where it goes before I give this one up and start again.

It's been a few months since I updated this post, so here it is.
This has turned out to be quite a challenging project. I used to do a lot more sculpting than I do today, so I am still a little rusty here. I originally wanted to create this project for a limited edition sculpt, but it is almost too large for that now. I am now at over 1 pound of clay and still climbing. The reality is that it's a lot of material to cast which could drive up the cost considerably. The thing is, instead of setting it aside and starting a new one, I decided that I am too close to quit now. I will see it through even if I decide not to cast it. So, the process has been slow going this year. I am involved with just too many projects to give this Maquette the proper attention. My last encounter was an eight hour sculpting session to try to get it to a finished piece.

Cole's face still isn't where I want it to be, but it is making progress.

He still kind of looks like a deer caught in headlights.

I am satisfied with the upper body progress. From the last update, I had to do some chopping of the torso, and adding much more material to give him the correct dimensions. In my first sculpts at the top of this post, his waist is too skinny and his shoulders are too wide.

You can see that he is starting to look a little more proportionate.

His facial structure and left ear look pretty good too.

I am not happy with his hair on this version, I have almost decided that I will shave off all of his hair leaving him bald before I bake the entire body and head. Once I do that, I will go back and add hair on top of his hardened bald head. It's much easier to sculpt soft clay over baked clay and then re-fire the whole thing. This process will allow me to get much greater detail without marking up the sculpted area that is already there.

His shoulders are starting to take shape.

I am very pleased with his back and muscle structure.

He looks quite human here, everything is almost in the right place.

Everything looks good, his torso might be a bit too long, and that pencil up his *ss can't feel very good.

The folds of his pants are coming along too. The feet were much harder than I expected but they are making progress.

His midriff area is really coming into it's own. The pant folds and belt have quite a bit of detail now.

Another profile shot showing his neck muscles and shoulder.

Here is a small top view to show symmetry.

I was having some major problems with his hair so I decided to go back to basics and add hair and accessories later.

I wiped out what I did and made him bald. I then started adding scars and bullet holes to his back. This guy has seen a lot of fighting so he has scars.

It was almost like starting over on his face because the previous updates didn't look a lot like my character.

Moving things around, I adjusted his nose and forehead along with the cheekbones.

New ears, new eyes and some facial cuts, and he is starting to look more like my character.

Just add whiskers and nipples, and reshape his pants.

His back is finally finished.


I am pretty happy with the face, mouth, teeth and tongue. It has been a long road, but he's getting a little closer.

Ok, now that the bulk of my body work is done, I must turn my attention to the base. I am thinking at this point, that I will cast this sculpture in 3 separate molds.

I am using regular Sculpey instead of the Super Sculpey here just to create a little contrast while I work, but also it's softer so it can have a more organic feel to it.

I want my character to be standing on a railroad track just like the book. so I need to cut in a place for a track.


Here I am adding some hand rolled pebbles and rocks, which I will go over with dental tools once they are all in place.

The little aluminum foil pads are so my character doesn't stick to the base. Sculpey has a tendency to bond with itself. The last thing I need right now is to lift him off the base while his feet stick to it.

I still have work to do on the base to make the metal look more like metal and the rock look more like rock.

I'm back to the hair again. This time over a freshly baked skull.


The hair is much better this time around, but still missing the final windblown touches.


Here he is hot out of the oven.


This shot looks pretty cool to me. It really reminds me of a scene out of my graphic novel. Alright, check back for more in a few weeks.

The finished product that has been enhanced with wax.

Some facial details and elements of dirt and grunge accentuated by using wax on top of Super Sculpey.


Now, it's on to arm removal. I used a Dremel tool to saw off the arms and then reattach them using wax. I am really trying to get a clean looking socket. This part is all about the clean up, so when I cast him the molds can be a little smaller and easier to cast.

Below is the wax version of the character.

This is the wax maquette sculpture of Cole, the main character of Prisoner of the Mind the graphic novel. This sculpture will be cast and produced as a limited edition resin kit available for pre-order during New York Comic Con. I will have all of the packaging done and a painted version of this sculpt available to see in a few weeks.

Here's the deal, I finished the first version of this sculpture only to find out on the way to casting, that it's just too large to cast using the facilities that I have at my disposal. The sculpt itself, was a little over 2 1/2 pounds of material. That's a whole lot of sculpture if your going to do a limited edition run which made it cost prohibitive. So, I went back to the drawing board after months of work on the first one and started over.

This new character above is about 2/3 rd the size of my first sculpture which you can see lying on his back behind this new character above. The first sculpture was made using Sculpey. This one is all wax, which in my opinion is much easier and more forgiving to work with. You don't need armature wire, because the wax is hard until you heat it. Nice! You can see the size above, because he's resting on a standard TP roll. Believe me when I say that it sucks to start over, but sometimes it's necessary to learn from your mistakes to make the final product better. After all, this is technically a prototype.

The overall structure of the character is done, and now onto the clean up, and then the finished work will begin over the weekend. Monday or Tuesday next week, the sculpture will be cast and I'll have two copies made from the original. Wednesday, I will paint one of the copies to show you what the possibilities are, and one of the castings will be raw so you can see what it will look like if you decide to buy one to paint yourself.

Here is a shot of his back, the musculature is really coming along, as well as the creases in his trousers.

Here is a close up on his face. I'll have to make him a little more grimacing, and a little less smiling for the final outcome. It's been a long road, but an entertaining one.

I used the same base as the first one above. I had to use a process called Hydroshrink to reduce the size of the base. Anyway, if you're interested in picking one of these figures up email me at Art@AllanLinder.com and once I set a price based on materials and time, I'll get back to you. The plan is to do a small run of only about 20 pieces so it will be extremely limited. Pick up a copy of the graphic novel on 10-10-13 next week to find out what all this hype is about. Thanks for keeping up!

Here is the final sculpt set in a mold with sprues attached and ready for silicone.

Right hand ready for casting also with sprues attached to the bottom of a paper coffee cup. You can still see the leftover coffee in the bottom, mmm... coffee. You can see the detail of the vein work on the back of the hand and the detail of the tire iron. I was originally going to cast the weapon separately, but with the arms removed from the character it will be much easier this way.

Left arm ready for casting.

...And finally the base is ready for silicone. If you remember above, I had to re-size the base to fit the size of the new character. The material looks different because I already had to make a mold of the original sculptured base, and then recast it using a rubberized material called Hydroshrink. It also required a little surgery to get the new figure to fit the same foot pattern etched into the bottom of the base. Updates are on the way once the silicone is poured and dry.
Drum roll please...

Ok, we have a resin casting. The following photos are of the resin castings, so you can see how well the detail came out. Obviously, i'll have to trim and patch the seams before I prime and paint it, but all in all, the casting came out perfect thanks to the help of my good friend Eli Livingston.


Check back for the painted update and final box art for the Prisoner of the Mind Cole Maquette "The end is near" limited edition resin kit.
The End is Near Resin Kit Packaging

Still working on the packaging, but it's almost there. It's a good way to start the year if you're interested, i'm taking pre-orders now. art@allanlinder.com
Happy New Year!


Social Plugin